Header-logo
  • 1317 Edgewater Dr #4250 Orlando, FL 32804
  • info@geekoro.com
  • Connect With Us
Dot Pattern

Printer Solutions

team image

1. Half-Page Printing

Problem Overview:

If your printer stops printing halfway through a page or cuts off content abruptly, it may be due to a few common reasons. One frequent cause is a spooling error, where the print job gets stuck or interrupted in your system’s print queue. Another possibility is low system memory, especially in older printers that can't handle large or graphic-heavy files. Outdated or corrupted printer drivers can also miscommunicate the print job to the printer, resulting in incomplete pages. A poor connection—whether USB or Wi-Fi—can further disrupt the data transmission midway, leading to abrupt stops.

What Could Be Causing It?

  • Print job stuck or corrupted in the spooler
  • Low system memory or printer RAM
  • Outdated or corrupted printer drivers
  • Poor USB or Wi-Fi connection
  • File too large or graphic-heavy

DIY Fixes to Try:

  • Clear the Print Queue: Cancel all current print jobs and restart both your computer and printer to refresh communication.
  • Check and Update Printer Driver: Go to your device settings, uninstall any outdated drivers, and reinstall the latest version from the manufacturer’s site.
  • Reduce File Size: If your document includes large images or heavy graphics, break it into sections or reduce the resolution.
  • Inspect Connection: Check USB cables for damage or reconnect Wi-Fi with a strong signal to avoid transmission failures.

Tips to Prevent This Issue:

  • Always keep your printer software and drivers up to date.
  • Avoid printing multiple large files back-to-back—give your printer time to reset.
  • Use recommended file formats like PDF or DOCX instead of oversized image-heavy files.
  • Periodically clear the print spooler if you notice delays or incomplete prints.
  • Use a stable, high-speed connection when printing wirelessly.

2. Wrong Color Output

Problem Overview:

When your prints come out with incorrect colors—like a photo that looks overly blue, skin tones that appear greenish, or faded reds—it’s often linked to low or dried-out ink cartridges, clogged printheads, or improper color calibration. Sometimes, the problem lies in the printer settings, such as selecting the wrong paper type or using grayscale mode without realizing it. Another possible cause is a mismatch between screen color profiles and printer output, especially if color correction settings are misconfigured.
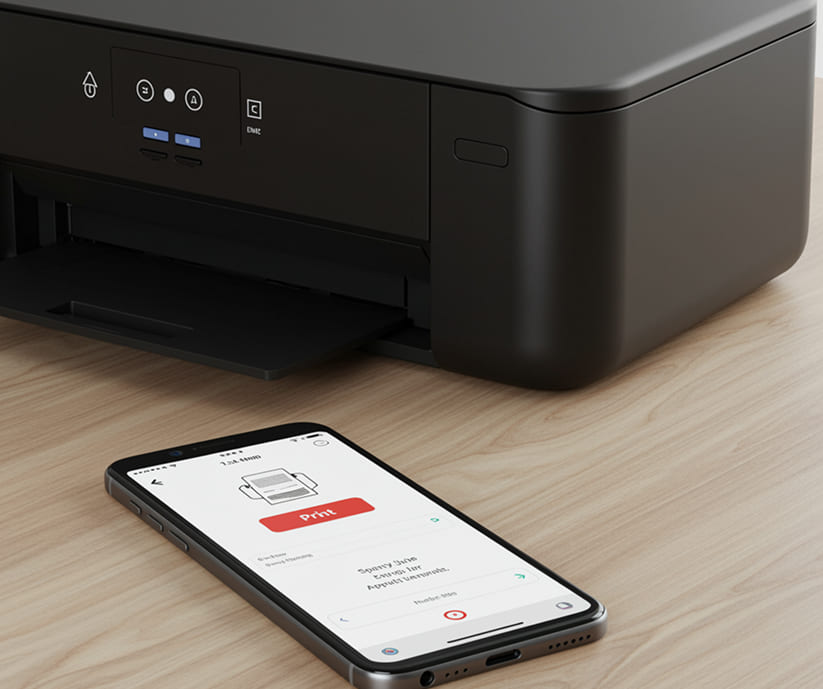
What Could Be Causing It?

  • Low or dried-out ink cartridges
  • Clogged printheads or blocked nozzles
  • Incorrect paper type or print settings
  • Color calibration or color management mismatch
  • Grayscale or economy mode enabled by mistake

DIY Fixes to Try:

  • Check Ink Levels: Replace any cartridges that are low, even if you're not printing that specific color.
  • Run Nozzle Check and Head Cleaning: Use your printer’s maintenance settings to clean printheads and unclog nozzles.
  • Match Paper Type and Settings: Make sure you’re using the right paper setting and print quality ("High" or "Best") for accurate colors.
  • Review Software Color Settings: Set your software (e.g., photo editor) to “Printer Manages Colors” to avoid mismatches.
  • Avoid Grayscale Mode: Double-check the print dialog box to ensure you're not printing in black-and-white or economy mode.

Tips to Prevent This Issue:

  • Regularly print in color to keep ink flowing and prevent clogs.
  • Store ink cartridges in a cool, dry place and use them within their shelf life.
  • Avoid mixing ink brands—stick with what your printer recommends for the best results.
  • Periodically align the printhead and calibrate color profiles, especially if you print photos or detailed graphics.
  • Always do a test print before printing important documents or projects.
team image
team image

3. Phone Won’t Print

Problem Overview:

You’re trying to print directly from your smartphone—maybe a document, photo, or email—but nothing happens. This is a common frustration and is usually tied to connectivity issues, such as your phone and printer not being on the same Wi-Fi network, or the printer not supporting mobile printing features like AirPrint (iOS), Mopria (Android), or wireless direct printing. Another common cause is using an outdated or incompatible printer app, or a printer being in sleep mode, paused, or offline without you realizing.

What Could Be Causing It?

  • Phone and printer are not on the same Wi-Fi network
  • Mobile printing feature not supported or not enabled
  • Outdated or incompatible printer app
  • Printer is in sleep, paused, or offline mode
  • Wi-Fi Direct not properly configured

DIY Fixes to Try:

  • Check Wi-Fi Connection: Make sure both your phone and printer are connected to the same Wi-Fi network. Compare network names in device settings.
  • Restart Devices: Power off and restart both your phone and printer to reset the wireless connection and clear any temporary issues.
  • Update or Reconfigure the App: If using a mobile print app, update it and check configuration. You can also try printing via your phone’s native Share > Print option.
  • Wake the Printer: Check if the printer is asleep, paused, or showing any error. Make sure it's fully online and ready.
  • Use Correct Print Method: If using Wi-Fi Direct or AirPrint/Mopria, make sure these features are enabled and supported by both the phone and the printer.

Tips to Prevent This Issue:

  • Ensure your printer supports mobile printing, and keep its firmware updated.
  • Save your printer as a favorite or default on your phone for faster access.
  • If using Wi-Fi Direct, don’t forget to reconnect your phone after restarts.
  • Use the same app consistently to avoid confusion between different platforms.
  • Periodically restart both devices if printing slows or disconnects.

4. Duplicate Images (Ghosting Issue)

Problem Overview:

Seeing faint or repeated images that look like shadows behind your printed content? This is known as ghosting, and it typically occurs in laser printers, not inkjets. The problem is often related to the drum unit or fuser assembly, where toner is not properly fused to the paper or excess toner is being transferred multiple times. It can also be caused by humidity, poor paper quality, or electrical issues affecting how heat is applied during printing.
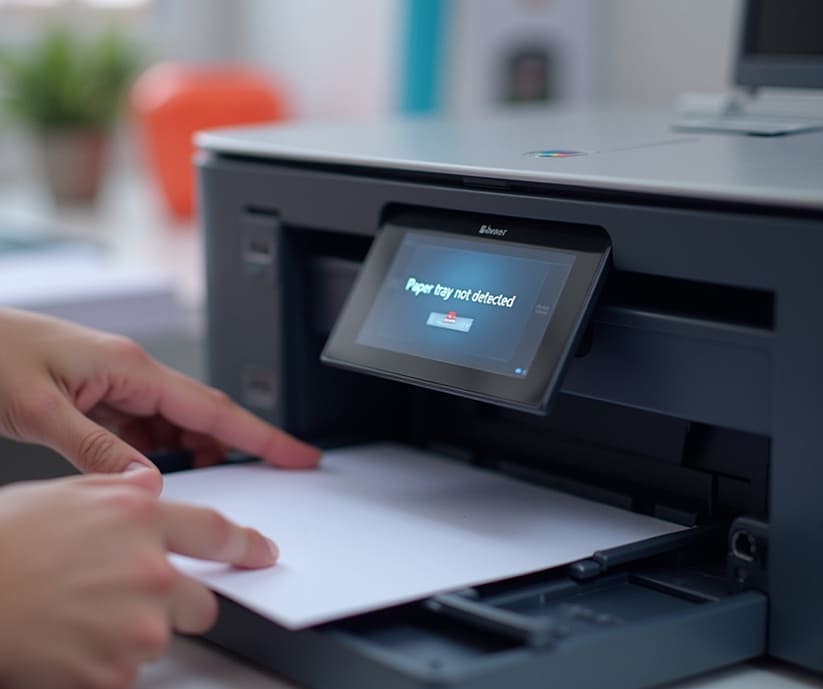
What Could Be Causing It?

  • Worn or dirty drum unit
  • Fuser unit not heating properly
  • Damp or low-quality paper
  • Toner buildup or improper transfer
  • Power inconsistencies during the print cycle

DIY Fixes to Try:

  • Print a Test Page: If ghosting appears in the same spot on each page, it's likely a hardware issue with the drum or fuser.
  • Inspect the Drum: Look for damage, toner buildup, or streaks. Run a drum cleaning cycle if available or replace if needed.
  • Check the Fuser Unit: Make sure it's reaching the correct temperature. Use your printer’s fuser cleaning mode, or replace the fuser if issues persist.
  • Adjust Paper and Settings: Use dry, high-quality paper and ensure your print settings match the type of media being used.
  • Control the Environment: Avoid printing in high humidity areas and store paper in sealed containers.

Tips to Prevent This Issue:

  • Use recommended, high-quality paper stored in dry conditions.
  • Replace the drum or fuser at the intervals suggested by the printer manufacturer.
  • Avoid power fluctuations—use a surge protector to keep print quality consistent.
  • Clean internal components regularly, especially if you print often.
  • If your printer supports it, enable auto-maintenance cycles to prevent toner buildup.
team image
team image

5. Tray Not Detected

Problem Overview:

If your printer displays a message like “Paper Tray Not Detected” or refuses to print because it can't recognize the paper source, it's often due to misaligned trays, foreign objects blocking sensors, or issues with the tray’s sensor mechanism or latch. In some cases, this error pops up when you’ve loaded an incorrect paper size or haven’t pushed the tray in fully.

What Could Be Causing It?

  • Paper tray not fully inserted
  • Foreign objects or dust blocking the tray sensor
  • Incorrect paper size or misaligned paper guides
  • Damaged or loose tray latch or sensor
  • Wrong tray selected in the print settings

DIY Fixes to Try:

  • Reinsert the Tray: Remove the paper tray and push it back in firmly until it clicks into place.
  • Check for Obstructions: Look for small debris, torn paper, or dust that might block sensors—clean with a dry lint-free cloth.
  • Adjust Paper Guides: Make sure the size guides are properly aligned to fit the loaded paper.
  • Match Paper Settings: Ensure the paper size selected on the printer or computer matches what's in the tray.
  • Select the Right Tray: If your printer has multiple trays, make sure the correct one is chosen in your print dialog.

Tips to Prevent This Issue:

  • Avoid overloading the tray or mixing different paper sizes.
  • Always align paper guides snugly with the stack.
  • Periodically remove and clean the tray to keep sensors dust-free.
  • Use the recommended tray configuration as per your printer’s manual.
  • Make sure the paper tray is pushed in fully before starting a job.

6. Printing Pauses Midway

Problem Overview:

A printer that starts printing but then suddenly pauses mid-page can be frustrating—especially when it resumes slowly or stops completely. This issue is usually caused by spooling delays, low memory, or background tasks competing for resources. Other causes include overheated printheads or fuser, network lag (for wireless printers), or even incorrect print quality settings that take longer to process.

What Could Be Causing It?

  • Print spooler delays or stuck print queue
  • Printer memory limitations with large files
  • Overheating of printhead or fuser unit
  • Weak or unstable wireless connection
  • High-resolution print settings slowing down processing

DIY Fixes to Try:

  • Restart Printer and Clear Queue: Cancel the current job, turn off the printer, clear the print queue from your device, and try again.
  • Lower Print Quality: Set print quality to “Draft” or “Standard” for faster processing, especially with graphics-heavy files.
  • Improve Wi-Fi Signal: If printing wirelessly, check your connection strength. Move the printer closer to the router or try a USB cable.
  • Check for Overheating: Let the printer rest for a few minutes if the printhead or fuser gets too hot.
  • Avoid Background Load: Close heavy apps on your computer or phone that may interfere with print processing.

Tips to Prevent This Issue:

  • Avoid sending multiple large print jobs at once—let the printer complete each one before starting the next.
  • Keep your system drivers and printer firmware updated.
  • Choose the right print quality based on your task to reduce processing time.
  • Regularly restart your printer if you use it heavily to refresh internal memory.
  • Use a strong and stable Wi-Fi signal for consistent wireless printing.
team image